はじめに
先日からAWS CDKを使ってAWSリソースを作成してみることをしています。前回までは以下の記事を参照。
今日はAppRunnerからElastiCacheに接続するアプリの環境を作成してみます。アプリケーションは以下の記事で実装したものを使います。
miyohide.hatenablog.com
ネットワークを作成
VPCやセキュリティグループを作成します。最初の実装を変更して、addEgressRuleを設定します。addEgressRuleを設定するにはSecurityGroupのコンストラクタにおいてallowAllOutboundをfalseに設定する必要があります。
import { Construct } from 'constructs';
import {
IpAddresses,
Port,
SecurityGroup,
SubnetType,
Vpc,
} from 'aws-cdk-lib/aws-ec2';
export class Network extends Construct {
readonly vpc: Vpc;
readonly appRunnerSecurityGroup: SecurityGroup;
readonly cacheSecurityGroup: SecurityGroup;
constructor(scope: Construct, id: string) {
super(scope, id);
this.vpc = new Vpc(scope, 'VPC', {
vpcName: 'myapp-vpc',
ipAddresses: IpAddresses.cidr('10.0.0.0/16'),
maxAzs: 2,
subnetConfiguration: [
{
cidrMask: 24,
name: 'myapp-Public',
subnetType: SubnetType.PUBLIC,
},
{
cidrMask: 24,
name: 'myapp-cache',
subnetType: SubnetType.PRIVATE_WITH_EGRESS,
},
],
natGateways: 0,
});
this.appRunnerSecurityGroup = new SecurityGroup(
scope,
'AppRunnerSecurityGroup',
{
vpc: this.vpc,
allowAllOutbound: false,
description: 'for myapp-app-runner',
securityGroupName: 'myapp-app-runner-sg',
},
);
this.cacheSecurityGroup = new SecurityGroup(scope, 'CacheSecurityGroup', {
vpc: this.vpc,
description: 'for myapp-cache',
securityGroupName: 'myapp-cache-sg',
});
this.appRunnerSecurityGroup.addEgressRule(
this.cacheSecurityGroup,
Port.tcp(6379),
);
this.cacheSecurityGroup.addIngressRule(
this.appRunnerSecurityGroup,
Port.tcp(6379),
);
}
}
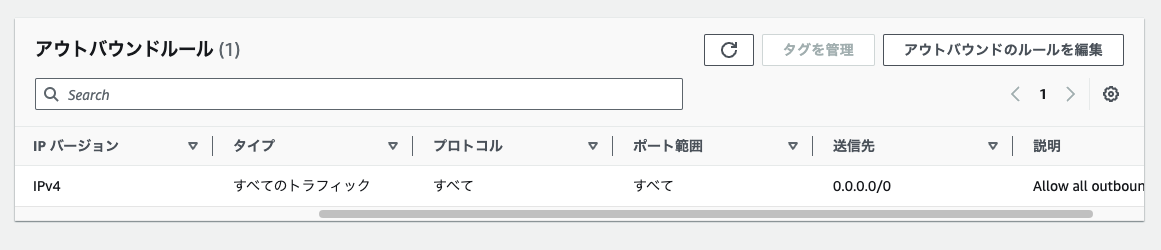
allowAllOutboundのデフォルト値はtrueでこのまま作成するとセキュリティグループのアウトバウンドは以下のような設定で作られます。
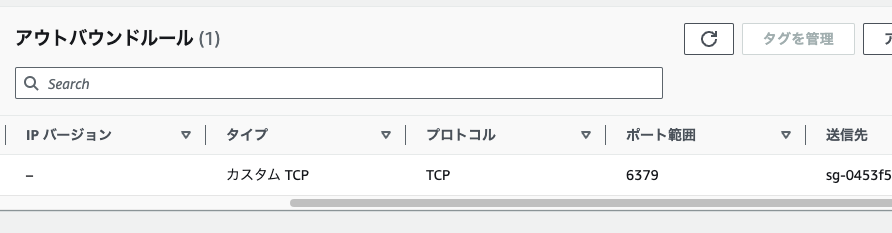
allowAllOutboundに明確にfalseを指定することでaddEgressRuleの設定が有効になり、以下のようなアウトバウンドが設定されたセキュリティグループがつくられます。
ElastiCacheを作成
CDKを使ってElastiCacheを作成します。検証用なので、ノードタイプをcache.t3.microに、ノード数は1とします。
import { SecurityGroup, SubnetType, Vpc } from 'aws-cdk-lib/aws-ec2';
import { CfnCacheCluster, CfnSubnetGroup } from 'aws-cdk-lib/aws-elasticache';
import { Construct } from 'constructs';

interface CacheProps {
  vpc: Vpc;
  cacheSecurityGroup: SecurityGroup;
}

export class Cache extends Construct {
  readonly cacheCluster: CfnCacheCluster;

  constructor(scope: Construct, id: string, props: CacheProps) {
    super(scope, id);

    const { vpc, cacheSecurityGroup } = props;

    const cacheSubnetGroup = new CfnSubnetGroup(this, 'CacheSubnetGroup', {
      subnetIds: vpc.selectSubnets({
        subnetType: SubnetType.PRIVATE_WITH_EGRESS,
      }).subnetIds,
      description: 'Group of subnets to place Cache into',
    });

    this.cacheCluster = new CfnCacheCluster(this, 'CacheCluster', {
      engine: 'redis',
      cacheNodeType: 'cache.t3.micro',
      numCacheNodes: 1,
      cacheSubnetGroupName: cacheSubnetGroup.ref,
      vpcSecurityGroupIds: [cacheSecurityGroup.securityGroupId],
    });
  }
}
App Runnerを作成
App RunnerからElastiCacheに接続するにはVPC Connectorの作成が必要です。また、ElastiCacheの接続先の設定も必要です。今回、接続先は環境変数で設定することとします。具体的なCDKの実装コードは以下の通り。
import { Construct } from 'constructs';
import { SecurityGroup, SubnetType, Vpc } from 'aws-cdk-lib/aws-ec2';
import { Repository } from 'aws-cdk-lib/aws-ecr';
import { CfnCacheCluster } from 'aws-cdk-lib/aws-elasticache';
import { ManagedPolicy, Role, ServicePrincipal } from 'aws-cdk-lib/aws-iam';
import { CfnService, CfnVpcConnector } from 'aws-cdk-lib/aws-apprunner';
interface AppRunnerProps {
vpc: Vpc;
repository: Repository;
appRunnerSecurityGroup: SecurityGroup;
cacheCluster: CfnCacheCluster;
}
export class AppRunner extends Construct {
constructor(scope: Construct, id: string, props: AppRunnerProps) {
super(scope, id);
const { vpc, repository, appRunnerSecurityGroup, cacheCluster } = props;
const accessRole = new Role(scope, 'AppRunnerAccessRole', {
roleName: 'myapp-AppRunnerAccessRole',
assumedBy: new ServicePrincipal('build.apprunner.amazonaws.com'),
});
accessRole.addManagedPolicy(
ManagedPolicy.fromAwsManagedPolicyName(
'service-role/AWSAppRunnerServicePolicyForECRAccess',
),
);
const vpcConnector = new CfnVpcConnector(scope, 'MyAppVPCConnector', {
subnets: vpc.selectSubnets({
subnetType: SubnetType.PRIVATE_WITH_EGRESS,
}).subnetIds,
securityGroups: [appRunnerSecurityGroup.securityGroupId],
});
const service = new CfnService(this, 'AppRunnerService', {
sourceConfiguration: {
authenticationConfiguration: {
accessRoleArn: accessRole.roleArn,
},
autoDeploymentsEnabled: true,
imageRepository: {
imageIdentifier: `${repository.repositoryUri}:latest`,
imageRepositoryType: 'ECR',
imageConfiguration: {
port: '8080',
runtimeEnvironmentVariables: [
{
name: 'REDIS_HOST',
value: cacheCluster.attrRedisEndpointAddress,
},
{
name: 'REDIS_PORT',
value: cacheCluster.attrRedisEndpointPort,
},
],
},
},
},
networkConfiguration: {
egressConfiguration: {
egressType: 'VPC',
vpcConnectorArn: vpcConnector.attrVpcConnectorArn,
},
},
});
}
}
Stackを作成
これまで作成したものを組み合わせてAWSリソースを作成します。
import { Construct } from 'constructs';
import { Network } from './construct/network';
import { EcrRepository } from './construct/ecr-repository';
import { Cache } from './construct/cache';
import { AppRunner } from './construct/app-runner';
import { Stack, StackProps } from 'aws-cdk-lib';
export class CdkStack extends Stack {
constructor(scope: Construct, id: string, props?: StackProps) {
super(scope, id, props);
const { vpc, appRunnerSecurityGroup, cacheSecurityGroup } = new Network(
this,
'Network',
);
const { repository } = new EcrRepository(this, 'Ecr');
const { cacheCluster } = new Cache(this, 'ElastiCache', {
vpc,
cacheSecurityGroup,
});
new AppRunner(this, 'AppRunner', {
vpc,
repository,
appRunnerSecurityGroup,
cacheCluster,
});
}
}
デプロイする
cdk deployを実行するとApp Runnerも作成でき、ElastiCacheにも接続することができました。